 Geek Prepper Survival Skills when SHTF!
Since the dawn of time, man has been on a quest to dominate fire. It started with the Neanderthals and continues with modern man. Fire is used in an infinite number of ways to help make life easier. Learning how to build, start and maintain a fire are skills everyone should have. It could save your life when SHTF.
1. What is fire
2. Pre-fire prepping
2.1. Tinder
2.2. Kindling
2.3. Wood logs
2.4. Tools
2.5. Tips
2.6. Wood stacking designs
3. Ways to start a fire
3.1. Improvised homemade methods
3.2. Made in the wild, natural materials
4. Starting & sparking tools
4.1. Store bought
4.2. Using chemicals
5. How to maintain fire
6. Extinguishing & clean up
Fire is a chemical reaction that occurs when certain conditions are met. When heat, fuel, and oxygen are combined, fire is born. This birth occurs because of combustion. In the presence of oxygen, when a form of fuel is heated to the temperature at which it can ignite, fire is produced. When you are gazing at the beauty of a fire, you are looking at a combination of gasses that include oxygen, carbon dioxide, water vapor, and nitrogen.
Fire protects, nourishes, and warms. It is used to help keep away wild animals and has been used as a tool in warfare. It is used to cook food that cannot be eaten raw. It warms us on cold days. Fire is also used to help grow food, create pottery, craft glass, and the list goes on. On the flip side, when out of control, fire is a fierce enemy. Man has always held fire in reverence because of what it gives and what it can take away.

2. Pre-Fire Prepping - Securing the Area
Before starting a fire, certain safety measure must be taken into consideration. Whether you choose to build your fire in the woods, on a campground, or in your backyard, there are different precautions that must be taken for each scenario. If you are starting a fire in the woods, you must choose an area that meets certain criteria. The area that you choose should be clear of overhead dangers like tree branches. You should also clear the area of dried leaves or anything else that could easily catch fire. Another thing to avoid is building your fire along a path that is frequented by wild animals. If you choose an area where there are a lot of animals like moose, deer, mountain lions and bears, your fire could attract them and you could put yourself at risk.
After securing the area, you must decide how you will build your fire. You can start the fire near a huge rock or create a fire ring created from stones. Avoid using porous rocks like sandstone or limestone for your fire ring as they can ignite or explode.
When building a fire on campgrounds, ensure that you build your fire in permitted locations. If there are fire pits on the campground, use these pits to start your fire. If you are building a fire in your backyard, you can use a ring of stones, a safety blanket, or construct a fire pit. These methods are effective at helping you contain the fire.
Tinder is any material that is very flammable and can easily catch fire from sparks or a flame. When building a fire, tinder is your foundation. Useful forms of tinder can be found in nature, made at home, or you can use commercial tinder.

Natural forms of tinder include materials such as:
- Pine needles
- River birch - River birch contains resin (natural oils) and will light quickly and burn longer.
- Cattail - A piece of cattail can be twisted so the fibers are released to create a small nest. Cattail catches fire easily, so it’s great to use when you want to start a fire fast.
- Dried thistle - Like cattail, thistle catches fire very easily.
- Cedar bark - Crush cedar bark into finer particles so it will light easier
- Fatwood - This material comes from the stump of pine trees. Also known as Maya sticks, you can cut shavings from these sticks down to use as tinder.
- Dead leaves, grass, thistle
- Dried orange peels, potato chips, corn chips
Some types of tinder that can be made at home include:
- Char cloth (char paper) - Char cloth can be made from fabrics like cotton or linen. Once made, you can carry pieces of char cloth in a small tin. This material has a very low ignition temperature and is very useful to use in damp conditions or when natural tinder is scarce.
- Vaseline cotton balls - Cotton balls covered in Vaseline are a very useful and economical form of homemade tinder. To make this tinder, all you need to do is coat cotton balls with a teaspoonful of Vaseline. You can store the Vaseline coated cotton balls in a Ziploc bag or a small, plastic container.
- Twine - Twine is another economical form of tinder. Pieces of twine can be cut into 6-inch length and then torn to create a tinder bundle.
- Dryer lint - Gather lint from your dryer and use it as tinder.
Commercial tinder can easily be bought. The advantages of commercial tinder over some types of natural and homemade tinder is that it has a very low ignition temperature and burns for a longer period of time.
- Fire tabs - Fire tabs are inexpensive pieces of bound fibers that can be used to start a fire.
- Fire cord (paracord) - Paracord can be cut into smaller pieces and then torn into bundles like twine.
- Wet fire tinder - Wet fire tinder is large tablets that can be used to start a fire even in wet conditions. You can use an entire tablet, break off pieces of the tablets, or use shavings to start your fire.
Kindling is small pieces of twigs or sticks that are used in starting a fire. After igniting the tinder, kindling is placed on the tinder to help build the fire. The twigs are usually anywhere from one-quarter to one inch in diameter and six to twelve inches long. Kindling can be found on the ground or snapped off the branches of dead trees. Other materials used for kindling include:
- Feather sticks - these are thin pieces of wood shaved down into curls.
- Fatwood - Wood that comes from a pine tree stump and cut into thin lengths. Other forms of wood can be split into small lengths to create kindling as well.
- Pine cones.
- Larger pieces of wood batoned into smaller pieces.

Tinder and kindling are needed to get the fire started, but wood logs are what will keep your fire burning for a long time. The length of time your fire burns correlates with the thickness of the wood logs. Smaller pieces of wood, like those found on the ground from dead trees and branches, will burn quickly and you will need to keep adding wood to your fire to keep it burning.
Larger pieces of wood will definitely burn longer, but they will be harder to find. Normally, you will have to cut the wood to the desired length with tools you have brought along with you.
Chances are that you will need to cut the wood you need to build your fire. For that reason, you will need to bring tools with you to get the job done. One of your most essential tools will be a solid, fixed blade knife for batoning. Others tools you will need to bring along are a hatchet and a saw.
Tools like a folding saw Japanese pole saw, bow saw, or a pocket saw are great ways to cut wood into smaller pieces without having to carry around heavy tools with you. Camp axes are also relatively lightweight and very handy when cutting wood. You can purchase lightweight, combination tools that come with multiple tools such as a Leatherman or the Zippo four in one woodsman. This tool comes with an ax, a saw, a mallet, and a tent stake puller.

When building your fire, you can choose from a variety of designs. Each design carries advantages and disadvantages with them. The teepee design is easiest, but this design will also burn the quickest. You can also choose a log cabin design, lean-to, Dakota fire hole, or a rakovalkea gap fire. With all the designs, it’s best to have your tinder, kindling and wood ready beforehand.
- Teepee Design
The teepee design is built by placing your kindling and firewood in the shape of a tent. You can add the tinder first, light it, and then stack the kindling and firewood in the shape of a tent, or you can leave a little door to put in the tinder after you have constructed your teepee. Some people find it hard to construct the teepee design as it tends to fall down into a big pile. One way to avoid this is to use a large pile of debris, like leaves, to give the structure a solid form. Once completed, add the lighted tinder through the small doorway or cubbyhole created earlier. You will need to keep adding fuel logs and kindling with this design, as the wood will burn quickly.
- Lean-to Design
This design is appropriate if you are building a fire where there is wind or rain and you need a method that will help get your fire going before it has the opportunity to be extinguished by the elements. You can build the lean-to by using a large log as a way to block the wind or rain. If you are building the lean-to on the dirt, as opposed to building it on a suspended platform like a rock, dig a small area around your tinder to allow more air to flow. The next step is to place your kindling so it leans over the tinder and against the big log. Once you have the fire going, you can add your fuel logs to the lean-to.

Courtesy Themanual.com
- Pyramid or Log Cabin Design
This design will burn longer and require less maintenance than the lean-to or teepee design. To start off, you will need to start off with your base logs. Place two logs about six inches diameter about a foot apart and place your tinder bundle and kindling in the center. For best results, place your kindling in a teepee style. Once that is done, you will stack logs on top of the base logs in an alternating pattern. From this point, there are variations in the construction of this design.
You can place the logs on top of base logs by two, three or four. Be mindful of the fact that the more logs you place in a row above the base logs, the more you will limit air flow. As you continue stacking the fuel logs in alternating fashion, you have the choice of using logs that decrease in size or using logs of the same size. Using logs of different sizes allows more air flow so your fire will burn higher and hotter.
- Self-Feeding Design
Out of all the designs mentioned so far, the self-feeding is the one that will last longest. It also requires less maintenance than the others if constructed correctly. This design is similar to the design of the log cabin fire with some slight variations. You begin construction of this design by placing logs on the bottom as a base, but these logs are placed close together. Only about an inch or two of space is left between the logs. Once the foundation is complete, you stack logs on top of the base logs in the same fashion as you do with the log cabin design. These logs will be close together, with three to four logs per layer. With this design, you will put your tinder and kindling on top instead of placing it on the bottom. Instead of burning from the bottom upward, the self-feeding burns from the top down and it burns slowly.
- Dakota Fire Hole Design
The Dakota fire hole design allows you to build a fire that won’t be seen from a distance, is great for cooking, and is very easy to put out. To begin, you will need to dig a hole in the ground up to three feet deep. The depth of the hole depends on the size of the fire you want to build. If you are planning on building a Dakota fire hole, it is a good idea to bring along a shovel. You could use your hands, a knife, or stick to build your hole, but it will be hard work and will take longer. After completing the first hole, you will need to dig a hole approximately twelve inches away and about half as deep as your first hole.

An underground passageway that connects the two holes will need to be created in order to provide a maximum flow of oxygen. Once you have finished digging the second hole, dig a hole the leads to the first one. It should be wide enough to put your arm through. Once you have constructed the holes, build a fire in the first hole as you would build any fire in any wood stacking design you choose. Then, add your tinder, kindling and fuel logs on top. This design works well for cooking food, can’t be seen from a distance, and is easier to clean up when you are finished with the fire.

Courtesy Offgridweb.com
- Rakovalkea Gap Fire
Break out all of your tools because you will need them if you want to build a rakovalkea gap fire. Although this design is labor intensive, the fire will last even longer than the self-feeding fire.
This design uses two long logs as the fuel. Fallen birch trees are optimal to use for this wood stacking design. Once you have carried the logs back to the camping area, it is time to prepare the wood.
You will need to create a channel on one side of the logs. The best tool for this will be your hatchet. Cut one side of each of the logs so that there is a channel in the wood that extends from one end to the other end. Doing this will cut off the bark and expose the dry wood inside. After creating the channels, you will need to gather long pieces of wood used to help support the logs. The best wood to use to support the logs is green wood.
For the support or base log, you will place pieces of wood about three feet in length close to the ends of the logs. The pieces of wood used to support the logs should be about one foot away from the ends of the logs.

You’ll also need two pieces of wood to wedge between the logs to leave space for kindling. These pieces of wood will have to be carved as well so that it creates a level surface between the logs. Another piece of green wood will be needed to use as a stake to hold the logs in place. Trim one end of this wood into a point and drive it firmly into the ground. The placement will be approximately two feet away one end of the base log.
In order to be sure that the top log doesn’t roll over once you’ve started your fire, you’ll need to take another stick and nail it to the top log at the opposite end of where you’ve placed your stake. At told, this entire process could take as little as 15 minutes. Your mileage may vary.
Now, it’s time to get the tinder and kindling in place. Place the tinder and kindling of your choice between the two logs. You will need to gather a lot of kindling to get the fire started and keep it going well. For tinder, you could use vaseline coated cotton balls, birch bark, or pieces of char cloth. For kindling, gather lots of dry twigs and wood of various sizes. If pine cones or fatwood are available, be sure to use that as well. The resins contained in the pine cones and fatwood will get the fire going faster and keep it burning longer.
Spread out your tinder and kindling well and then light it up. Once lit, you will notice the flames spread quickly. If you notice the flames dying down, keep adding small fuel logs between the gaps. If constructed correctly, the rakovalkea gap fire will burn brightly and last all night.
Batoning - Use this technique to cut bigger pieces of wood into kindling. Choose a piece of wood that is lightweight, dry, and between 16 and 32 inches. Set the wood on a level surface like a tree stump and wedge your fixed blade knife or hatched in the center. Use another piece of wood to drive the blade downward to create thinner pieces of wood.
With a long piece of firewood, saw halfway through the pieces and then break the pieces with a stick or by stepping on it firmly with your foot
If you want a really fast way to break larger pieces of wood into smaller pieces, you can elevate the ends of a fallen tree between two rocks. Use another large rock and smash it into the middle of the tree to get it to break. This method will only work with dead trees so be very careful.
Another way to break longer pieces of wood is to wedge it between u-shaped tree and break it. Put some WD40 on your blade when cutting wood to make it slice through the wood easier.
You’ve learned about tinder, kindling, fuel logs and wood stacking designs. Now, the various methods to start a fire will be addressed. You can start a fire with batteries, magnifying glasses, natural materials like flint rock, sticks, and chemicals. Of course, the easiest way to start a fire is with tools like matches or a lighter. Read on for detailed information on the different ways to light your fire.
3.1 Improvised Homemade Methods
- Fire Piston
A fire piston consists of two parts. The first part is a cylinder which has a hole in the center and the second part is the piston. This device is constructed such that there is an airtight seal when the piston is inserted into the cylinder. It functions by creating a dramatic increase in temperature (as high as 500 degrees Fahrenheit) when the piston, along with an easily flammable material such as char cloth, is rammed into the cylinder.
To use the fire piston, you need to insert a piece of char cloth or other flammable material onto the end of the piston. Insert the piston so that it is seated into the cylinder and then firmly grasp the cylinder with one hand and depress the piston by slapping with your hand. Once that is done, carefully remove the piston and your char cloth should now be a small coal. Carefully transfer that coal using a knife or a stick onto your pile of tinder. Loosely grasp your tinder bundle and blow on it until it produces a fire.
- Battery and Steel Wool
You can start a fire very quickly by using a battery and steel wool. The most popular method involves using a 9V battery. A 9V battery works easiest because the negative and positive terminals are on one side. To get a fire started with steel wool and a battery, all you need to do is touch the terminals to the steel wool. It will immediately give off bright sparks. Once the steel wool ignites, you can quickly transfer it to your tinder bundle and blow on it to help feed the fire.
- Magnifying Glass
You can start a fire with a magnifying glass, eye glasses or anything through which the sun’s rays can pass. By directing a beam of sunlight through a magnifying glass and aiming it on a flammable material like paper, char cloth or a piece a wood, you can start a fire. The sun’s beams must be directed through the lens of the magnifying glass until a small dot is visible on the object you want to burn. Once you see the dot, try to hold the lens steady for ten to twenty seconds until the object begins to smolder. Once achieved, transfer your ember to a tinder bundle and blow on it until you’ve got a flame. This will work with any object that has a convex lens including eye glasses, binoculars and a clear bottle filled with water.
3.2 Made in the Wild from Natural Materials
Bow drills, fire plows, and hand drills are the most difficult ways to start a fire. These methods are labor intensive but if you are successful in starting a fire, you will get a great sense of accomplishment. With these methods, it is crucial to choose the right types of wood. To get the best results, these natural fire starters should be made of wood from trees like sotol, cedar, cattail, basswood, and aspen.
- Bow Drill
One of the earliest methods for making fire was through friction and that is exactly how a bow drill works. Bow drill have four main parts that include the bow, hearth board, bearing block, and the drill.
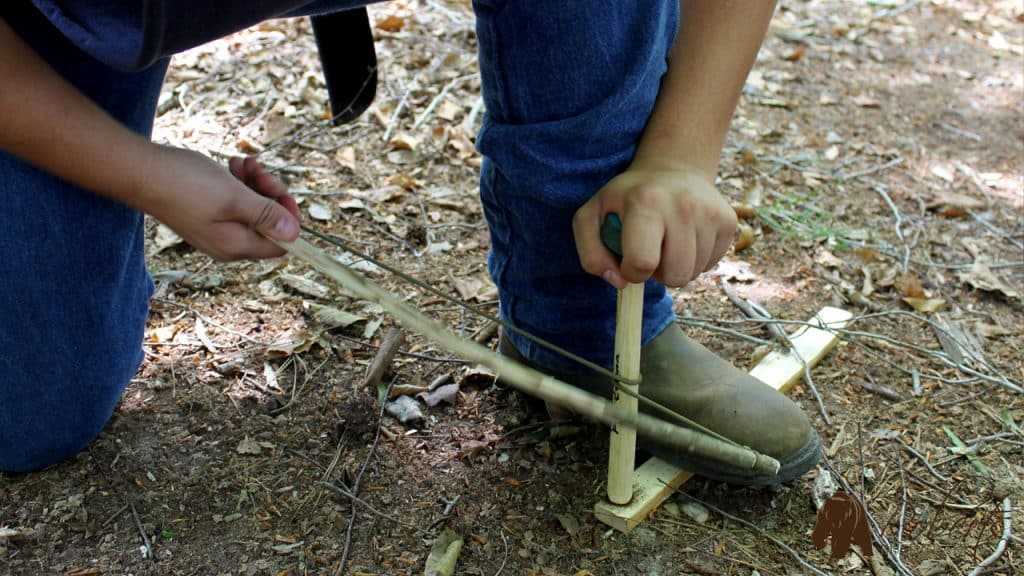
Courtesy Robertsbushcraft.com
To create embers with a bow drill, the first step is getting the hearth board ready. Cut a small depression in the board about one inch away from the edge. Place the hearth board on a surface like a flat rock, and place one foot on the edge of the board so you can drill. Then, take your drill and wrap it around the string of the bow so that it fits snugly. Place one end of the spindle into the depression you created and place the bearing block on top of the drill to hold it in place. Move the bow back and forth in a sawing motion repeatedly until you see smoke coming from the hearth board. Stop and cut a wedge into the wood with the point aimed at the center of the depression you created.
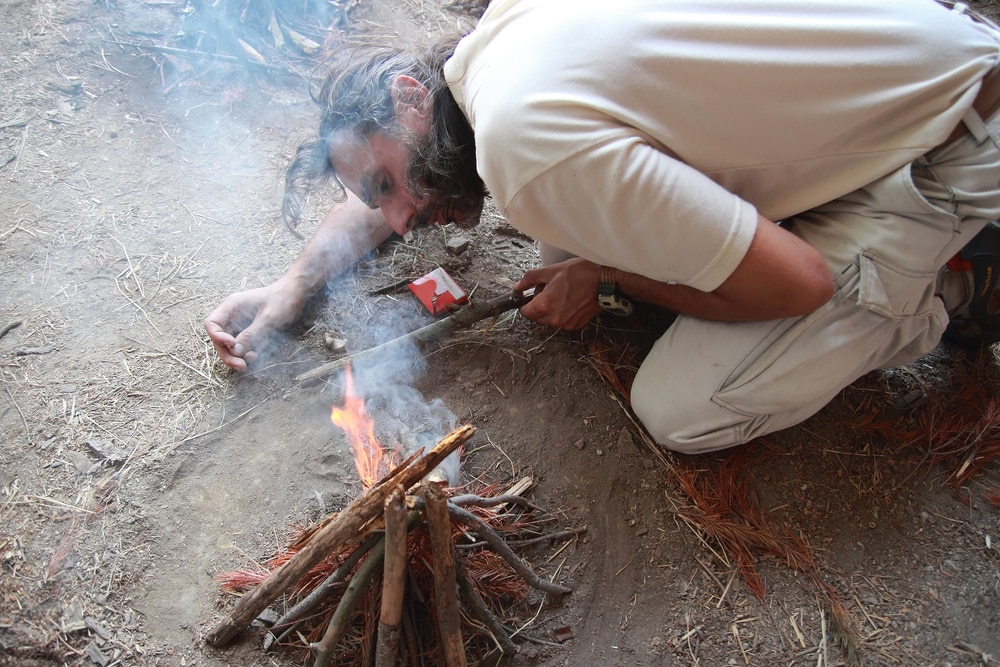
Now you are ready to make your ember. Recreate the steps above but this time put a leaf or piece of wood under the hole to catch the ember. You will need to keep constant pressure on the drill and keep sawing back and forth until you see smoke coming from the hole. It will take time, practice, and you will burn some calories but in the end a nice ember will be formed. Gently lift your hearth board and with a knife or small twig, remove the ember so it rests on the leaf or piece of wood and then put it on your tinder bundle. Blow on it and when a fire has started, add it to your chosen wood stacking design.
- Fire Plow
A fire plow is another way that you can product embers or coals by rubbing sticks together. Preparing the wood to make a fire plow is not as labor intensive as making a bow drill, but if your technique is correct and you craft your tools well, you should get the same results. Oak, hickory, elm and ash are good materials to use for your fire plow.
Start off by choosing a piece of wood from a fallen branch that is completely dry. This will be your baseboard. Use your knife to cut off the bark and other rough edges until both sides are level. Find another piece of wood, preferably from the same tree, and cut it down to a length equal to that of your forearm. Then whittle it down until there is no bark and one end is cut at about a forty-five-degree angle.
The side with this angle is what you will use to plow into your baseboard. When this is complete, you will take the smaller piece of wood, place it on the baseboard at an angle and keep moving the stick vigorously back and forth until you start to see smoke. After a period of time, you will create a depression in the wood. When you start to see little pieces of black soot, plow faster and make sure not to go beyond the point where you see the pile of coals. When you start to see smoke, continue plowing for another minute or two. You should be rewarded with a small ember for your efforts. Transfer this ember to your pile of tinder and blow on it gentle until a fire starts.
- Hand Drill
Like the bow drill, creating fire with a hand drill requires that you craft your tools. Whereas with a bow drill you will optimally need to make six different tools, with a hand drill you only need to make a drill and a hearth board (fireboard).
As with the hearth board for the bow drill, the fireboard should be cut so it is level on both sides. The fireboard should be one-fourth of an inch in width. Once the fireboard is created, take your knife and cut a small divet into the wood.
When you are done crafting a fireboard, you will need to find or make a drill or spindle. For your spindle, you will need to choose a piece of wood that is roughly three-eighths to one-quarter inches wide and from twenty to thirty-two inches in length.
Creating the fire: The first step is to take the working end of the spindle and put it into the small divet you created earlier. Next, take the drill between the palm of your hands and rub your hands together while applying downward pressure. When applying downward pressure your hands will naturally move downward. For this reason, you will need to keep repositioning them so they are are the top of the spindle. Continue this process until you have created a black mark in the hole. Use your knife or small saw to make a triangular notch in the wood where the point of the triangle is in the center of your divet.

When this is complete, rest the hole on a dry leaf or piece of wood. Using the same action you used to create the black mark in the hole, keep rubbing the drill between your palms and applying downward pressure as quickly as possible. The key to creating an ember is to keep the friction going as long as you can until you see steady smoke coming from the hole in your fireboard. Once this is achieved, use a slim stick or knife and lift the fireboard to reveal your ember and transfer it to your pile of tinder.
- Using Rock to Start a Fire
When it comes to making fire with rocks, the harder the rock, the better the sparks. On the Mohs hardness scale, flint rock is 7 but so are chert, jasper, and quartz. Flint rock is the most commonly thought of rock when it comes to making fire, but you can also start a fire with the other rocks mentioned. In fact, you can get sparks from any rocks that share the same properties. If the rock has a smooth, shiny surface, sharp edges, and facets, there is a high chance you will be able to create sparks with the rock.
There are two techniques you can use to start a fire with rocks. The first technique works best if you use iron pyrite or marcasite stones together, or one of these stones with flint, quartz, jasper, or chert. By striking any of these two stones together and using a highly flammable tinder like tinder fungus or char cloth, you will be able to start a fire.
The other technique commonly used to start a fire with stones is to have a fire striker. The fire striker can be a knife or a carbon steel striker. Carbon steel strikers come in various forms, but the most popular form is c-shaped and allows you to grasp it in such a way that makes the steel easier to handle and helps protect your knuckles from being cut on the sharp edges of the rock. To create a spark with a fire striker and a rock, you just need to hit the striker against an edge of flint rock until sparks are produced. Putting a piece of char cloth on the edge of the rock that you are striking is an easy way to quickly catch a spark and start a fire.

Knowing how to start fires with homemade and natural materials is a great skill to have, but most require a lot of work and there is the risk you will not be able to start your fire with these methods. For this reason, it is a good idea to carry starting tools with you. The list of starting tools include ferrocerium rods, fire starters, lighters, and matches.
- Ferrocerium Rods
Amongst outdoorsman and survivalists, ferrocerium rods, or ferro rods, are a favorite when it comes to starting fires. These rods are compact and can be purchased with a piece of striking steel attached to it by a chain or you can just buy the rods and use a knife as a striking tool. In addition to ferrocerium rods, you can purchase magnesium blocks that can be used in combination with ferrocerium rods.
Ferrocerium rods are exceptional tools because they allow you to produce sparks that can reach temperatures higher than 3,000 degrees Fahrenheit. Magnesium, when ignited, burns at temperatures that are 1,000 degrees higher than sparks created by ferro rods.
To use magnesium and ferrocerium rods to start a fire, you only need to use your knife to scrape shavings of magnesium onto your tinder. Place the magnesium block close to your tinder to get the shavings in a small area. Then, scrape your knife or striking tool against the ferro rod in a downward motion so that the sparks will catch on the magnesium shavings. The shavings will catch fire easily. In wet weather conditions, magnesium will be your best friend because it burns quickly and white hot.
- Fire Starters
If you want a fire starter that produces sparks like a ferrocerium rod, but operates like a lighter, you can use something like the Blastmatch or Sparkie. These tools will produce strong sparks and, unlike the other tools mentioned, you only need to use one hand to operate it.
- Lighters
Lighters are considered primary fire starters because of the ease with which you can create a flame. By depressing a button or rolling your thumb over the spark wheel, you can create a flame in seconds that can be added to tinder to help you start a roaring fire. Lighters are definitely the easiest to use when starting a fire, but they are difficult to operate when it’s cold and they can easily break down leaving you with no easy way to start a fire.
- Matches
Matches, like lighters, are also considered to be primary fire starters. But not all matches are created equal. Paperboard matchbooks like those you get at restaurants are the least desirable. These matches are flimsy, unreliable, and extinguish quickly in wet weather. Wooden stick matches are better because they will burn a bit longer and are made with a more durable material. You can use normal wooden stick matches which require you to strike it against a specific material or strike anywhere matches. Strike anywhere matches, like the name implies, are matches that can light when struck against any rough surface. However, if you want truly reliable matches, then you want to invest in stormproof matches. These wooden stick matches have an orange, potassium chlorate coating that allows the match to stay lit even after being submerged in water.

4.2 Using chemicals to start a fire
Another interesting way to start a fire is by using chemicals. You can start fires rapidly and easily using chemicals, but there are some drawbacks. When using chemicals, you need to make sure your eyes and skin are protected so you won’t get burned.
- Potassium Permanganate
Potassium permanganate is a chemical compound that is made of potassium and permanganate ions. These ions form to make crystals with a purplish to a black hue that can be combined with other substances to create a fire in seconds. Here is a list of ways you can make fire with this chemical.
By mixing potassium permanganate with glycerin in a five to one ratio, you will be able to start a fire in less than a minute. If the fire starts too slowly, add a drop or two of water. You can also start a fire by combining this chemical in a one to one ratio with sugar and grinding the ingredients together In under a minute, you can get a fire started by mixing equal parts of potassium permanganate with brake fluid.
- Sulfuric Acid
Sulfuric acid is a substance that is colorless to yellowish in hue and has the capacity to destroy others substances that it comes in contact with. The corrosive nature of sulfuric acid can help you if you want to start a fire quickly.
Adding equal amounts of sodium chlorate and sugar with a few drops of sulfuric acid will produce a fire quickly. Sugar, potassium perchlorate and a few drops of sulfuric acid will instantly create a fire.
Other ways that you can start a fire with chemicals include:
Place finely ground particles of zinc and ammonium nitrate on paper and then add a few drops of hydrochloric acid. Pool chlorine added to brake fluid is another way to chemically start a fire.
There are innumerable ways to get a fire started, but they will all be pretty useless to you in a survival situation if you can’t keep that fire going. In order to keep your fire going, you have to remember the three components that are necessary to make a fire. In order to make fire, you need air, heat, and fuel.
- Air
When oxygen is cut off, your fire will be extinguished. You can easily test this by lighting a candle and covering it with a jar or cap. Likewise, if the fire you build is being smothered by the fuel because you’ve placed them tightly together and cut off airflow, it will go out or be very difficult to maintain. No matter which wood stacking design you choose, make sure that there is enough space between the kindling and fuel to always allow oxygen to circulate.
- Heat
Heat is another thing to consider when maintaining a fire. If you’ve started a fire and only have a few coals or embers burning, heat is not being produced in sufficient quantities and your fire will go out. If your fire is dying, add kindling to it and then add more fuel logs to get the fire raging higher and hotter.
- Fuel
Tinder helps get your fire started, kindling is the next step to get it to grow bigger, but your fuel logs are what ultimately will sustain the fire. If you are trying to maintain your fire with only kindling made from small twigs or branches that are small, you will constantly run out of fuel and trying to maintain your fire will be a real chore. Good fuel logs have a diameter at least the size of your wrist. You will increase the size depending on the wood stacking design you choose and the length of time you want the fire to burn.
6. Extinguishing and Cleaning Up
A roaring fire will keep you warm, help you cook your food, and give you something beautiful to look at but you can never forget the dangers of fire. Many forest fires or house fires have started due to carelessness and left behind a path of destruction. When you are done with your fire, extinguish the fire and thoroughly clean the area.
- Extinguishing the Fire
One obvious way of extinguishing your fire is with water. If possible, have a bucket of water nearby, when you are ready to put out the fire. Before adding water, separate the pieces of wood with a stick. Carefully spread out any logs and coals that are still burning. Next, slowly pour the water over any logs and burning coals. You may be tempted to just dump the entire bucket of water quickly over the logs and coals but try to avoid that. Doing this could create a great deal of smoke and ash which could be dangerous to you. In addition, there is a good chance you will not properly extinguish the fire and that means another trip to the lake or creek to get more water.
When you don’t see any steam coming from the log and/or coals, hover the back of your hand over the coals. If you still feel the heat radiating from the coals, add more water. Keep checking the coals and adding water until you can touch them without burning yourself. Optimally, you should have added enough water that in the end, your bed of coals has a soupy consistency.
Water is the best way to put out your fire, but if you have no water available, sand or dirt can be used. When using this method, you will need an amount of sand or dirt that is equal to or greater than the number of coals remaining. This process will involve adding sand (or dirt) and stirring until you have smothered the burning coals.
- Cleaning Up
After ensuring that your fire has been completely extinguished, it is time to clean up. If you have a pile of coal remaining, take handfuls of it and disperse it over a large area far away from the campsite. After this is done, use a tree branch or your hands to cover the area with dirt or fallen leaves. Cleaning up the area after you are done with your fire is good for the environment and a courtesy to those who will visit the area after you. Enjoy your time in nature and all the wonders it has to offer but always remember to leave no trace.


